Friday, October 31, 2008

Undermount Kitchen Sinks

By Tim Carter
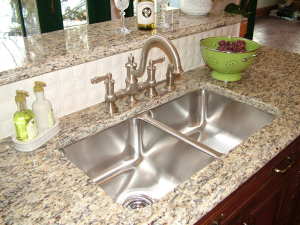
Summary: Undermount kitchen sinks are sleek and gorgeous. Kitchen sinks that undermount below the countertop are perfect for granite, marble, solid surface or engineered stone countertops. A granite undermount kitchen sink is what I have in my own home.

DEAR TIM: Are undermount kitchen sinks a good idea? I have never had one, and am worried about leakage where the undermount sink contacts the underside of the countertop. I want a granite undermount kitchen sink, but am worried the sink will pull away from the granite countertop. This would be a nightmare, especially if the sink was filled with water. What undermount sink installation tips can you share that will allow me to buy one with complete confidence? Christy F., Flemington, NJ


DEAR CHRISTY: The first thing I can tell you is an undermount kitchen sink will give you a lifetime of leak-free performance if it is installed correctly. I have several undermount sinks in my own home, and they simply do not leak where the sink touches up against my granite countertops.


Years ago I felt the same way you did about undermount kitchen sinks. It was the plumber in me that made me a Doubting Thomas. After all, a standard double-bowl sink that has a disposer on one side and is completely filled with water weighs well over 100 pounds. I think it is reasonable for a person to wonder how in the world the sink will stay permanently attached to the countertop with this kind of weight regularly trying to pull the sink down into the base cabinet.


High-strength epoxies
and silicone caulk are the simple answer. The undermount sinks are held in place with metal anchors that are glued to the underside of the stone with a two-part epoxy that cures rapidly and has incredible tensile strength once cured. Furthermore, a bead of silicone caulk helps bond the sink to the stone.


One installation tip is to make sure the underside of the stone countertop is dust-free. Dust will cause the epoxy bond to fail. Any installer worth his salt will take a brush to remove stone dust from underneath the countertop. Dust in this location is a strong possibility because of the cut made to create the hole for your sink.


The granite countertop fabricator had to cut a special-shaped hole in the stone top to create the hole for your undermount sink. Once the cut is made, the fabricator has to polish the rough stone edge. The water that is used during the polishing process gets very small pieces of stone in it, and this slurry can roll to the underside of the countertop. Once the water component of the slurry evaporates, the stone grit or dust is left behind.


Most undermount sinks come with very clear written installation instructions. Every set of instruction I have seen calls for a bead of clear silicone caulk to be placed around the flat lip of the undermount sink. This continuous bead of caulk acts as the waterproof seal between the sink and the countertop once the undermount sink is pressed permanently against the stone countertop.


Most professional installers can install an undermount kitchen sink in 30 minutes or less. The tools required are a 2x4 longer than the sink cutout is wide, one or two bar clamps, the special two-part epoxy and the caulk and caulk gun.


Once the installer knows the underside of the stone top is dust-free, he applies the silicone caulk to the sink lip. The sink is then pushed up against the underside of the stone top and centered under the polished cutout. The 2x4 is then placed on top of the countertop spanning across the sink. One end of the bar clamp goes through the large drain hole in the sink and the other end goes on top of the 2x4. A double-bowled sink needs two clamps, one for each drain hole.
The clamps are partially tightened and the reveal of the sink is checked to make sure it is even around the entire cutout of the granite. The clamps are then fully tightened. It is now time to mix the two-part epoxy and apply it to the small bolt posts that are glued next to the lip of the undermount sink. The installers are on their backs in the sink base looking up when they do this.
The epoxy sets rapidly, usually in ten minutes or so. After this wait period, the rest of the hardware that clamps the sink to the bolt posts is installed. It is good to wait at least one day before the plumber arrives to connect any drain piping or a heavy disposer to the undermount sink.


Before the drain piping is attached to the sink, it is wise to tighten the nuts that hold the clamps in place. Do not over tighten. Simply make sure they are snug. The adhesive properties of the silicone caulk in conjunction with the epoxy hold the sink permanently in place.


The biggest mistake you or an installer can make is trying to rush the job. All too often an aggressive plumber, remodler or homeowner will try to finish the entire job the same day. They will wait six or seven hours thinking the epoxy is plenty hard, only to discover that the weight of a heavy disposer pulls the sink away from the countertop.

Thursday, October 30, 2008

Stainless Steel Sinks 101

What to Look for in a Stainless Steel Sink
Whether you're building, remodeling, or just sprucing up your kitchen, choosing a sink that suits your needs is crucial. These guidelines are designed to help you make the best choice for your kitchen - for years of optimal performance and high quality appearance.

Are there different types of stainless steel for sinks? Yes. In fact, some steel sinks look bright and shiny at first, but rust or corrode in time. Therefore, we select premium-grade steel for our high-end residential sinks, stainless steel Type 302. It has the best combination of chromium and nickel for superior corrosion resistance and durability. Also, this alloy "gives" a little, reducing the chance of dish breakage. Lastly, this steel allows for the sinks to have elegant designs.

How important is the steel's thickness? Very. The thicker the steel, the less susceptible it is to denting, bowing and noise transmission from pots and pans hitting the metal surface. The thickness, called "gauge", can be determined by its number. The lower the number, the thicker the steel. Most sinks come in 18 or 20 gauge steel. The 18 gauge is the thicker of the two-more than ample thickness for residential sinks.

What about the finish of the steel? Look for a rich, deep, satin-smooth finish rather than a surface gloss. The luster comes from machine and hand-finishing operations, which enable the sink to keep its beauty for years - without cracks, chips, rust or stains. Many feel that the look actually improves with age, taking on a soft patina glow.

How do I decide on the size and number of bowls? Consider your lifestyle.
Do you:-have a big family-prepare most meals at home-entertain often-or do extensive food preparation, in which case, you may need a big deep sink
Also consider a sink with a built-in work surface. For simply stacking pots and pans, your sink should just be deep enough with at least one large bowl for washing.


How do I compare sink size and capacity? Bowl depth, taper and radius are the three basic sink measurements for comparing sink sizes. Depth, of course, is the distance from the top of the rim to the bottom of the sink next to the drain. Bowl taper is the inward slope of each side of the sink from rim to bottom. Radius is the measure of the bowl's corners & bottoms where the sides and bottom meet. The point to remember is this: the deeper the bowl, the straighter the slope, the smaller the radius, the more useful the sink capacity.


How do I measure sink depth? Lay a straight edge across the top surface of the sink rim. Then use a ruler to measure the distance between the bottom edge of the straight edge and bowl bottom, as close to the drain as possible.


How are sinks installed? That depends on the brand and style of sink, and your countertop. Most top mount sinks can be mounted on virtually any countertop using our unique clip-and-bolt fasteners that adjust to the countertop thickness for a tight, non-slip mount. They fasten the sink and countertop from the bottom, with no need to screw any hardware into the countertop itself. Some undermount sinks, on the other hand, are mounted and caulked from underneath to a solid surface countertop. The result for both sinks is a solid fit and an attractive, finished look that's absolutely waterproof when properly installed.

Top mount or undermount sink? This is completely a matter of personal preference. Do you like the "finished" look of the raised rim of a top mount sink? Our top mount design helps keep water off the countertop. Or you may prefer the trim, clean, uncluttered look of an undermount sink. You'll generally have many choices in both sink styles.

How important is the undercoating? It's extremely important because it absorbs sound, protects against condensation and helps maintain sink water temperature. Some sinks are spray-coated with our exclusive nontoxic, latex-based undercoating.

Wednesday, October 29, 2008

Eliminate a sink-ful of germs

By Ed Biado


Did you know that your kitchen sink is probably very dirty? Microbiologists know something that most of us don’t. They are aware that millions of bacteria and germs live and multiply endlessly in every part of the house. And the sink is one of their most favorite breeding grounds. To get you started, remember that the number one rule is to clean with a fresh clean cloth and/or sponge. If what you’re using to clean ain’t clean, it ain’t gonna do no cleanin’! While you think about that, here are 10 more tips:


1. Clean your sink daily to avoid acids from damaging its finish. A soapy solution is enough for your sink’s daily wash-down. A cloth soaked in vinegar will help you remove spots and mineral residue. Running the damp cloth over the entire sink should do the trick.


2. For stains, cut a lemon in half and sprinkle baking soda on the cut ends. Scrub sink stains with the lemon half. Reapply baking soda to the lemon as needed. If you can’t remove it using this simple solution, look for commercially available cleaners that are specifically formulated for stubborn stains.


3. An alternative is to mix a small amount of baking soda, about two teaspoons, with a cup of warm water. Allow the baking soda to dilute. Dip a wet sponge in the solution and clean the sink using small circular motions. Dry the sink with paper towels. If there are still stains, wetting the entire surface of the sink and liberally sprinkling baking soda onto the sink’s surface will help you deal with them stubborn ones.


4. You should also sanitize the drainage system. Pour one cup of baking soda solution followed by one cup of vinegar down the drain to get rid of odors and clogs. Allow the water to run for about a minute. Cool tap water is fine, but warm water will help eliminate more germs.


5. Never neglect your sink’s faucet and faucet handles. Fill a spray bottle with one part vinegar and one part water. Spray the faucet—and handles—to disinfect them. Wipe them dry and buff them to a shine with a dry paper towel.


6. Disinfect every week. Fill it with warm water and add a capful of bleach. Slosh some water into the overflow and scrub around it and the plug with an old toothbrush. Stubborn mineral residue can be dealt with by lining the entire sink with paper towels soaked in vinegar. Allow the vinegar to work its magic for about 30 minutes, undisturbed.


7. The cleaning doesn’t stop there. It should also extend to the countertops, especially the one adjacent to the sink as it pretty much has the same germ content.


8. Clean with anti-bacterial sponges. Sponges are the helipad of germs in any house because bacteria actually grow in them. Anti-bacterial sponges won’t kill the germs, but will prevent their growth. A good option in the stores is the Scotch-Brite Anti-Bac Scrub Sponge.


9. It’s best if you have different sponges to clean your dishes and sink with. It’s even better if you have one specifically for the sink, one for knives and cutting board for meat, one for knives and cutting board for vegetables, one for glasses and one for used dishes. Replace the sponges before they get tattered.


10. Avoid harsh chemicals, abrasive sponges and other solutions and products that are not made to be used on your sink. Different kinds of sinks (stainless steel, ceramic, etc.) have different thresholds on substances. Some cleaners might damage the surface of your sink.

Introduction to Stainless Steel for Your Kitchen Sink

Stainless steel kitchen sinks possess great qualities that make them a good choice for any kitchen. Their look is timeless and complements stainless appliances. They can be rugged and durable but quality construction is important in obtaining longevity and long term good looks.


Before running out to buy any stainless sink, there are points to consider about the type of steel used, it's thickness and whether or not it's insulated.


Other considerations include the type of finish, since there are several to choose from, and the style and configuration. Finally, you'll want to understand what it will take to clean stainless steel sinks. They can look beautiful in the showroom but like any other product for your home that you want to keep looking nice, they'll need some maintenance too.

http://www.home-style-choices.com/stainless-steel-kitchen-sinks.html

Tuesday, October 28, 2008

The Elegance of Copper Sinks

Copper sinks are very elegant. They can be used to make a bathroom look elegant or a kitchen look antique. There are many different types of copper sinks. Each one is nicer and more elegant than the next. Choosing the copper sink for you can be a bit more difficult.

There are many bad choices to be made when choosing a copper sink. Unless you are aware of what you are doing, you could make one of the several mistakes.
You could choose a sink that does not age well, loses its shape, or turns rusty. There is a lot of research to be done when it comes to copper sinks. There are many different types of copper sinks and many different rules to follow when choosing and caring for a sink.

Are Copper Sinks Easy to Care for?
Many people make the mistake of not purchasing a copper sink because they think that there is too much maintenance involved in taking care of them. People believe this because of the day of the copper bottom pans. Before there was Teflon there was the copper bottom pan. These pots and pans required regular scrubbing and polishing.
This was too much work for most people. People look back and they remember how terrible it was to polish and scrub a pan, why would they want to polish and scrub and polish a copper sink? The scrubbing and polishing are just a myth. Unless it is a highly polished, decorative piece, polishing and scrubbing is not necessary. Copper sinks require no maintenance at all.

How Should I Maintain my Copper Sink?
Maintaining a copper sink is not difficult at all. When it comes to maintenance of a copper sink, the less you do the better. Copper sinks do not require any type of polishing or scrubbing. Copper sinks are made with a patina appearance. The look is “fired” in. It gives the copper sink an aged, weathered look. This is the desired look for copper sinks.
There are a few things that you can do for your copper sink to keep it looking its best. The first thing that should be done is rinsing. After you are finished using the sink, it is a good idea to rinse out whatever soap is left behind. If you live in an area where the mineral content in the water is high, it is a good idea to wipe out the sink after you rinse it.
If the hard water is left to sit on the sink’s surface for too long, it can cause spots on the sink or even ruin the patina finish. Cleaning you soap with a cleanser is necessary occasionally. It is very important, however, to use the right cleanser and cloth. All you need to clean your copper sink is a soft cloth and a very mild cleanser. Anything abrasive can scratch the sink and ruin the patina. Polishing is something that you can do whenever you feel necessary. It is especially important if you have a high mineral content in your water.
The wax will protect your sink from developing hard water stains. The best way to tell if your copper sink is in need of a polish is whenever the water stops beading up on the surface of the sink.Copper is a natural antibacterial. Unlike stainless steel sinks, copper sinks actually fight bacteria. It has recently been proved that bacterial can only live on a copper sink for a few hours. Bacteria can live on stainless steel for several days. Your copper sink actually does most of the cleaning work by itself.
It is important to know, if you have a kitchen sink, the foods that could be dangerous to your copper kitchen sink. Acidic foods such as tomatoes, lemons, vinegar, or mayonnaise can damage the patina of the sink. If these types of foods sit on the surface of the sink too long, they can end up causing permanent spotting. When using these foods, it is important to clean the sink thoroughly when you are finished.

Will my Copper Sink Dull with Age?
Many things in life become dull and lose their luster with age. Copper, however, is lucky enough to improve with age. When a copper sink is first made, it has a pinkish salmon hue.
As time goes by the pink fades to a nice russet shade, then becoming a nice, deep, rich tone. The speed that the copper begins to dull and become more beautiful, depends on a few different things. The first is how much the copper sink is used. If, for example, it is in a person’s guest bath which is hardly ever used, the aging will take longer. If it is used daily, it will be faster. It is nice to know that there are some things in life that look even nicer as they age.

What Should I do if I Scratch my Copper Sink?
The fact that copper looks more beautiful with age is amazing enough, but the idea that copper sinks can heal themselves is almost unbelievable. It is true though. If you happen to scratch your copper sink, you should do nothing.
Because of coppers “living finish” properties, the copper sink will heal itself. All that you are required to do is maintain your copper sink in the same manner as you usually do. In time, the scratches on the sink will fade out and disappear, making the copper sink look beautiful.
With all of these wonderful qualities about copper sinks, a person would be crazy not to want one. They require no maintenance, they improve with age, and they heal themselves. Along with looking beautiful they are the easiest type of sink to maintain.


Copper Sinks From AlphaOutlets.com

A FEW COPPER SINKS OFFERED BY ALPHAOUTLETS:


Houzer Opus Hand Hammered Copper Vessel Sink


Antimicrobial Properties of Copper May Aid in Food Safety

Dr. Venkat Yelamanchili
"These results clearly demonstrate the antimicrobial properties of cast copper alloys with regard to E. coli O157, and consequently these alloys have the potential to aid in food safety,"


By American Society for Microbiology, A new study suggests that the use of cast copper alloys during food processing may help prevent cross-contamination of E. coli better than stainless steel say researchers from the University of Southampton, United Kingdom and Copper Development Association Inc., New York. Their findings appear in the June 2006 issue of the journal Applied and Environmental Microbiology.Escherichia coli O157 is one of the most serious food-borne pathogens worldwide causing physical effects ranging from diarrhea to hemorrhagic colitis. Cattle is a major reservoir of E. coli O157, therefore outbreaks are primarily associated with consumption of undercooked ground beef. Cross-contamination of infected meat with points of contact during processing makes it extremely difficult to maintain. Currently, stainless steel has been the metal of choice for food preparation, however, studies have shown that even with consistent cleaning and sanitation procedures bacteria can remain viable.In the study cast copper alloys (a mixture of metals containing varying degrees of copper) and stainless steel were exposed to E. coli, some mixed with beef juice, some without, and incubated at either 22 degrees Celsius or 4 degrees Celsius for up to six hours. Results showed that three copper alloys not exposed to beef juice completely killed E. coli when stored at 22 degrees Celsius and only the alloys containing high quantities of copper (85% or more) significantly reduced E. coli at 4 degrees Celsius. With beef juice, alloys consisting of 93% or more copper greatly reduced E. coli at 4 degrees Celsius, while only one alloy (containing 95% copper) completely killed the bacterium at 22 degrees. No significant reduction in cell numbers was reported for stainless steel."These results clearly demonstrate the antimicrobial properties of cast copper alloys with regard to E. coli O157, and consequently these alloys have the potential to aid in food safety," say the researchers.


Materials: Antimicrobial Copper For Your Kitchen Sink

Antimicrobial Copper

Copper has been recognised as a hygienic material since the dawn of civilisation and, in the last two centuries, the anecdotal evidence has been supported by scientific research showing that copper is antimicrobial, i.e. it inhibits the growth of harmful pathogens - bacteria, moulds, algae, fungi and viruses.
The antimicrobial uses of copper currently include fungicides, antifouling paints, antimicrobial medicines, oral hygiene products, hygienic medical devices, antiseptics and a host of other useful applications. The latest scientific research demonstrates copper’s antimicrobial effect on a range of disease-causing organisms including MRSA, Clostridium difficile, E.coli, Listeria monocytogenes, Influenza A and Aspergillus niger, indicating a role for copper in applications where control of these germs would be beneficial:

Healthcare
Food processing
Heating, ventilation and air conditioning (HVAC)
Transportation
Through the ages

It is important to note that, while copper's antimicrobial properties inhibit the growth of micro-organisms, it is also an essential mineral and vital to the good health of humans, animals and plants.

Healthcare Applications
Each year, hospital-acquired infections in England cost the National Health Service in the region of 1 billion pounds (infections result in an average extension to a hospital stay of 11 days per patient) and at least 5,000 patients die of complications from infections that they contracted in hospitals, according to a report by the National Audit Office. At any given time, 9% of hospitalised patients in the UK i.e. 300,000, have an infection that they did not have before they arrived.
Not all hospital-acquired infections are preventable but UK infection control teams recognise that a 15% reduction could be achieved through a series of infection control measures, including improved hygiene, which would lead to savings of approximately 150 million pounds a year. 80% of infectious diseases are spread by touch. It has been shown that a hand contaminated with influenza A virus will contaminate the next 7 surfaces that are touched.
Replacing frequently touched surfaces with copper or high-copper alloys such as brasses and bronzes, which are naturally antimicrobial, could be an important infection control measure and complement other measures such as hand washing, patient screening and isolation, and improved cleaning. Frequently touched surfaces in hospitals/care homes which could be made from copper or copper alloy include: door handles, push plates, light switches, bed rails, grab rails, intravenous poles, dispensers (alcohol gel, paper towel, soap), dressing trolleys, counter and table tops. These touch surfaces are all potential reservoirs of infection, and reducing the number of live germs on these surfaces could help in controlling the spread of MRSA and other hospital-acquired infections.
Copper alloys are homogenous, will go on working 24/7, will withstand wear and scratching, so integrating these materials into the hospital environment could provide another weapon in the fight against hospital- acquired infections.

Through the ages
Microbes weren’t discovered until the 19th Century but copper’s hygienic properties were well known through experience and tradition. The Egyptians, Greeks, Romans and Aztecs used copper compounds for the treatment of disease and good hygiene. Egyptians used copper as a sterilisation agent for drinking water and wounds. Hippocrates treated open wounds and skin irritations with copper. The Romans catalogued numerous medicinal uses for copper for various diseases. The Aztecs treated sore throats with copper, while Persia and India applied copper to treat boils, eye infections and venereal ulcers. Once the germ theory of infection linked bacteria and other microorganisms to infection and disease, scientists began to understand how copper’s antimicrobial property could be harnessed to provide additional benefits.

http://www.copperinfo.co.uk/antimicrobial/